Setting up your KB2040 microcontroller #
Stuff you need #
- A computer, plus the admin password to install software
- An Adafruit KB2040 microcontroller board
- A USB-C data cable with the right ends to connect the KB2040 to your computer
Hardware setup #
Step 1: plug in your KB2040 to your computer #
The next step is to plug in your KB2040 to your computer with a USB data cable. When you plug it in, you should see a green light on the board near the USB C jack, showing that the KB2040 is getting electricity. Make sure to use a data cable, not just a power cable!
Once the board powers up, it’s time to load CircuitPython onto it.
Step 2: download CircuitPython to your laptop #
To your computer, download the latest version of CircuitPython for the KB2040. Putting CircuitPython on your computer is an intermediate step. You are not going to run CircuitPython onto your computer - your eventual goal is to get CircuitPython onto your KB2040.
Step 3: enter bootloader mode #
Enter the “bootloader” mode on your KB2040 by holding down the BOOT (boot select) button as you press and release the RST (reset) button. Continue to hold down the BOOT button until the KB2040’s bootloader drive appears as “RPI-RP2” on your computer. You need your KB2040 board in bootloader mode to install or update Circuit Python.
Step 4: copy CircuitPython onto your KB2040 #
Find the CircuitPython file that you downloaded onto your computer. Drag that file to the KB2040’s boot drive (the RPI-RP2 drive).
Step 5: be patient #
Watch for RPI-RP2 to disappear and a new drive to appear on your computer called CIRCUITPY. When you see the CIRCUITPY drive, you know that your KB2040 now has CircuitPython installed on it, and it is ready to receive, store, and execute Python files. Congratulations!

The steps above are adapted from Adafruit’s CircuitPython tutorial. You can find more details at https://learn.adafruit.com/welcome-to-circuitpython/installing-circuitpython.
Software setup #
Before you can actually make a microcontroller do anything, you have to install a code editor on your computer. We’ll use the Mu Editor, which works well with Adafruit CircuitPython boards, including the KB2040.
To install the Mu Editor, download it from the Mu website.
You’re on your own for the actual installation, but it consists of pressing “OK” and “Next” and things like that a few times. Adafruit’s CircuitPython tutorial provides step-by-step instructions for installing Mu here: https://learn.adafruit.com/welcome-to-circuitpython/installing-mu-editor
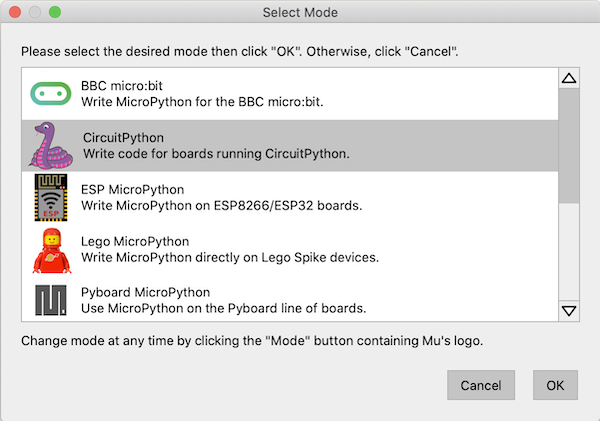
Your goal is to see something like the image below on your screen.

The first time you run Mu, you’ll need to select its “mode.” Choose “CircuitPython.”
Make the software talk to the hardware #
Load a Python program onto your KB2040. #
The next step is to load your first Python program onto your KB2040.
With CircuitPython installed, your KB2040 will look for and execute any Python program named code.py that is saved in the CIRCUITPY drive. Your KB2040 will do this on its own every time it starts up or resets. Every time the contents of the code.py file are changed, the KB2040 is triggered to reset – and therefore to execute the updated code. You do not need to manually run the new code.
You can save code files with other file names, besides code.py, on your KB2040’s CIRCUITPY drive, but they won’t be executed by your KB2040. You will need to change their name to code.py in order for them to be run.
To create and load your first program, follow these steps:
- Open the Mu editor.
- Click the Load button, find the CIRCUITPY drive, and choose code.py.
- Copy and paste this code into the Mu editor
import board
import digitalio
import time

led = digitalio.DigitalInOut(board.D4)
led.direction = digitalio.Direction.OUTPUT

while True:
    led.value = True
    time.sleep(0.5)
    led.value = False
    time.sleep(0.5)
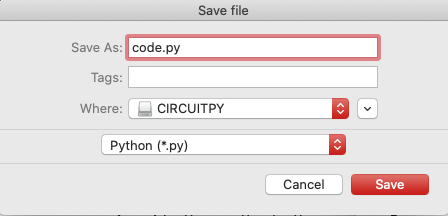
To load it onto the KB2040, click the “Save” button in the Mu editor’s top menu. Navigate to the CIRCUITPY drive and save the file as code.py.
As the code is uploaded, you might see the green power LED flash rapidly for a moment.
After the code is saved on the KB2040, if you wire an external LED from pin D4 to the GND pin, you should see it blinking once per second.
If you’ve made it this far, your hardware and software are working properly. Congratulations! Go get a drink of cool, delicious water!
More about Python programs for the KB2040 #
Check out our KB2040 programming page to learn the CircuitPython commands most often used to control motors and LEDs.
Alternative KB2040 programming tutorials #
Adafruit’s CircuitPython Tutorials are great if you’re new to this stuff. Please take the time to run through them; it’s an investment worth making. Microcontrollers are not going away soon.
When stuff goes wrong #
The most common problem with microcontrollers is difficulty communicating between the computer and the microcontroller. You might see messages like “Circuit Python device not connected.”
In this case, you should hold down the BOOTSEL button while pressing and releasing the RESET button, to make sure your computer sees the KB2040’s CIRCUITPY drive.
You can also try unplugging the KB2040 and plugging it in again and restarting the Mu Editor.
Make sure you are using a cable that can transfer data, not just power. This is the most common source of trouble.