Raspberry Pi setup #
Video omission
Warning! The video above leaves out the step explained below where you enable SSH and set the password. If you get to the login prompt successfully, but the (obsolete) default password doesn’t work, that’s probably why.
Stuff you need (all in your kit) #
- Raspberry Pi 4
- micro SD card
- USB-C power supply
- USB-serial adapter, AKA a console cable
You may also need a USB card reader, if you don’t have a card slot built into your computer. We have extra adapters that you can borrow to write data to your SD card if needed.
To connect the console cable, look at this diagram.
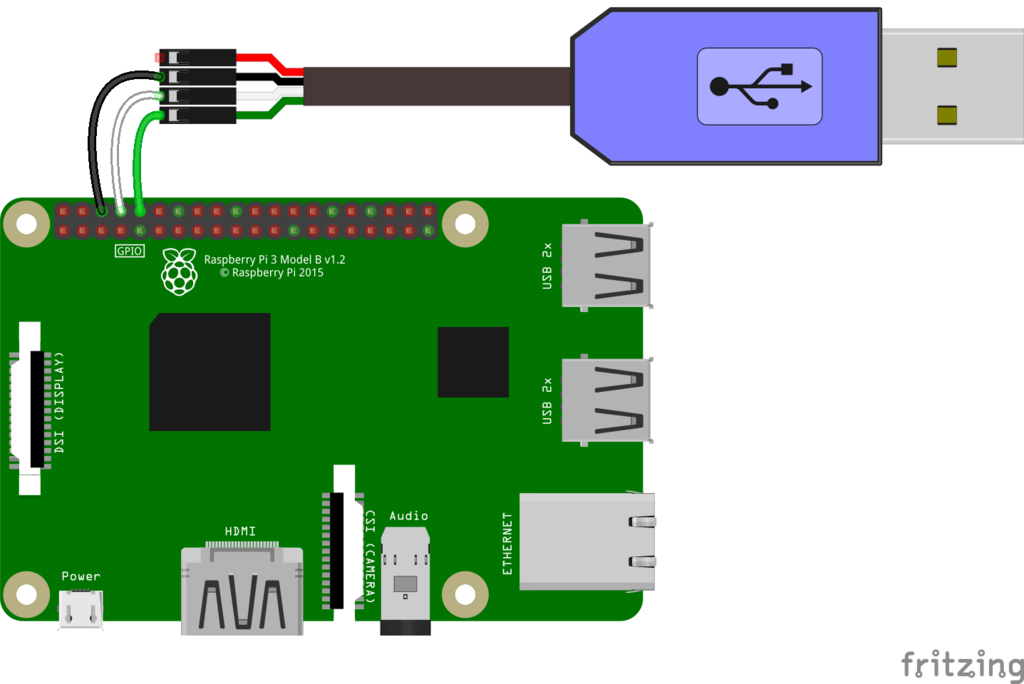
There are more details about the console cable if you need them in Adafruit’s console cable tutorial. If you want to go deeper on how console cables and terminals work, try the Sparkfun tutorial.
Setup checklist 1: “Image” the OS to the SD card #
- Install the Raspberry Pi Imager from the Raspberry Pi Software page
- Plug your microSD card into your computer.
- In the Imager, set "Raspberry Pi Device" to "Raspberry Pi 4".
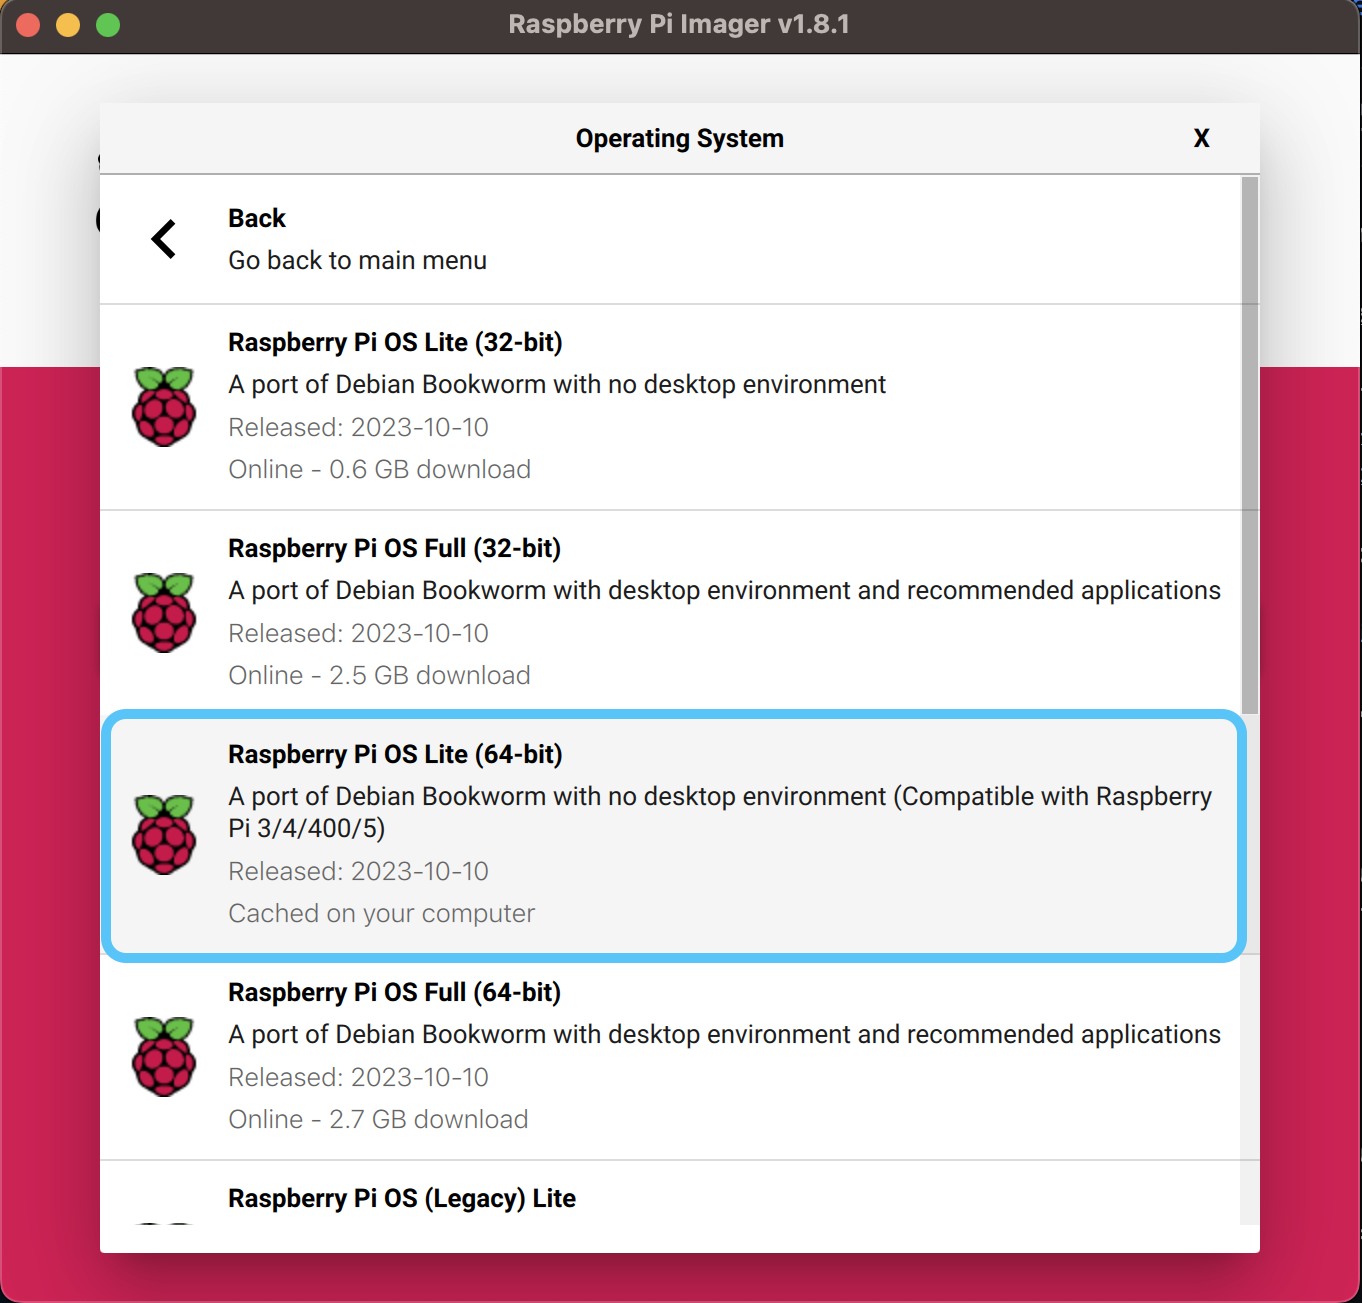
- Choose the image "Raspberry Pi OS (other)" --> "Raspberry Pi OS Lite (64-bit)"
- Set "Storage" to be your microSD card. You can identify it by its size, which is probably 32 GB.
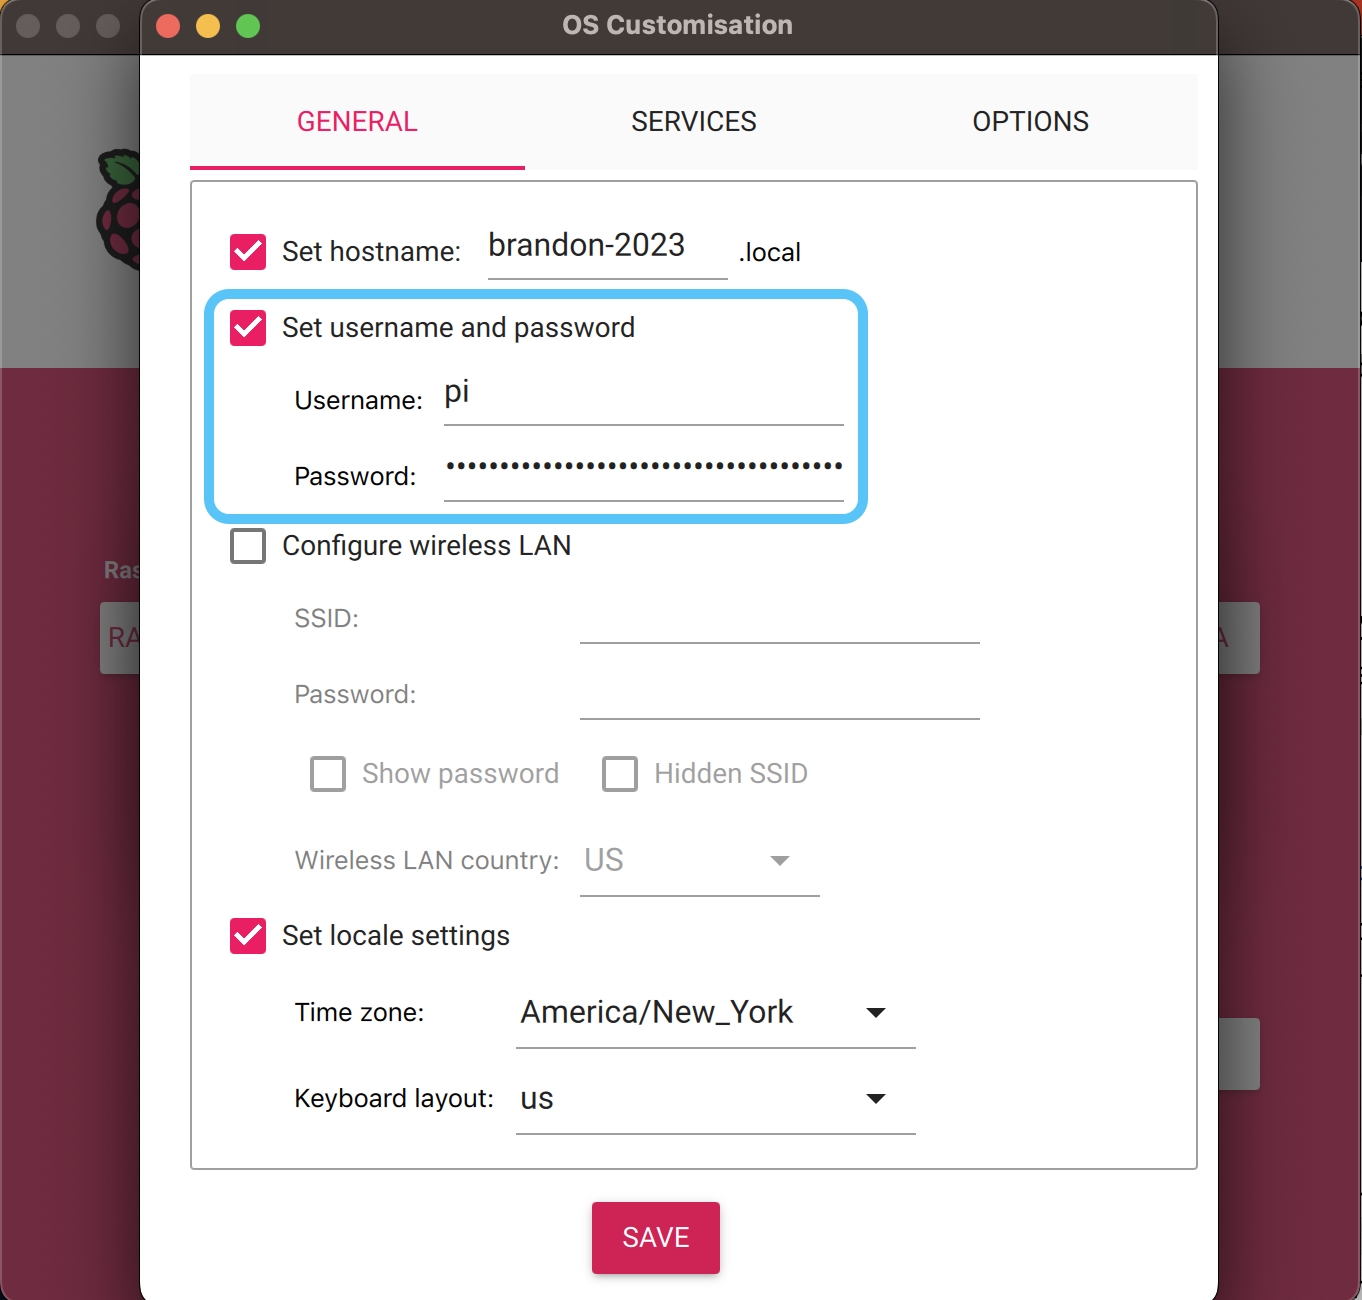
- Click "Next" and then "Edit Settings" in the "Use OS Customisation?" pop-up.
- In the "General" tab, set the username as
piand set the password toME30. - Also in the "General" tab, check the "Configure wireless LAN" box and set the SSID to "Tufts_Wireless."
- In the "Services" tab, enable SSH.
- The moment of truth! Erase the card and write the new OS to the card.
- Eject the SD card and then re-insert it into your laptop.
- Edit config.txt on the microSD card to include on the last line:
enable_uart=1
Setup checklist 2: Connect to your Pi via serial console cable, and find out your Pi’s MAC address #
Mac laptops #
- Connect the Pi to your laptop with the console cable
- Put the microSD card in slot of Pi
- Open Applications > Utilities > Terminal (macOS)
- In Terminal, run
ls /devand find the entry that saystty.usbserial-[some numbers]. - Record the numbers you see after "usbserial." Then run
screen /dev/tty.usbserial-[those numbers] 115200 - Connect USB-C power cable. Wait a minute or so for the Pi to boot up
- Log in with the username
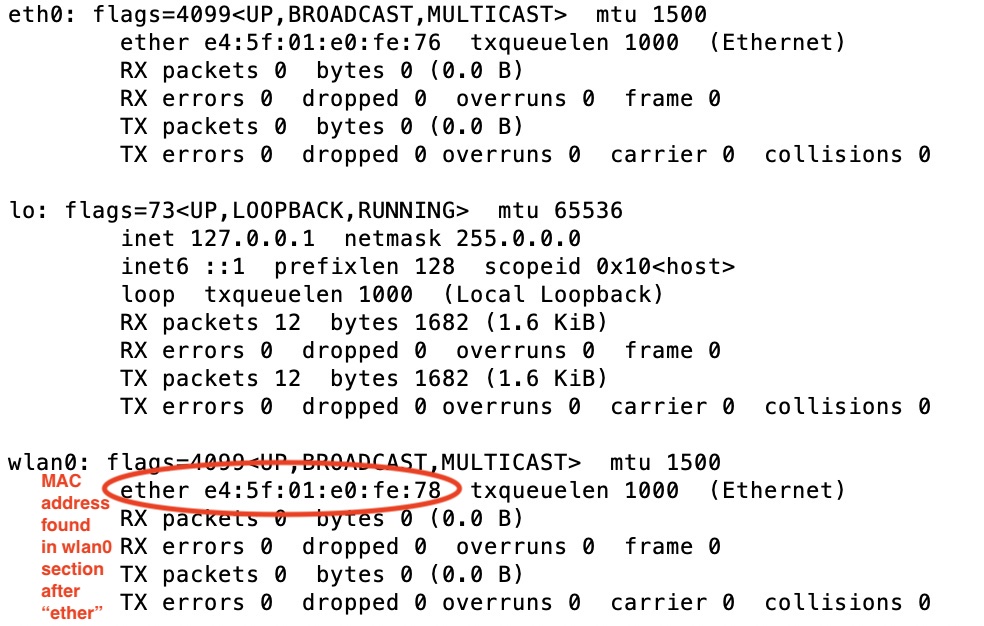
piand password you set using the Imager - To figure out the Pi's MAC address, type the command
ifconfig. Be sure you get the MAC forwlan0, noteth0. As shown in the screenshot below, the MAC address is something likee4:5f:01:3b:33:fband appears after the wordether.
PC/Windows laptops #
- Install the SiLabs CP210X USB driver for the console cable. (The Universal one should work.)
- Connect the Pi to your laptop with the console cable
- Put the microSD card in slot of Pi
- Install PuTTY (Windows)
- Use Device Manager to determine what COM port your serial cable is communicating with
- In PuTTY, start a serial session at 115200 bps to the Pi
- Connect USB-C power cable. Wait a minute or so for the Pi to boot up
- Log in with the username
piand password you set using the Imager - To figure out the Pi's MAC address, type the command
ifconfig. Be sure you get the MAC forwlan0, noteth0. As shown in the screenshot below, the MAC address is something likee4:5f:01:3b:33:fband appears after the wordether.
Set-up checklist 3: Get your Pi on IP address on Tufts_Wireless #
- Register that MAC address with Tufts IT at the Tufts registration page. If using Chrome, you'll probably need to use an Incognito window
- Wait a few minutes for MAC address permissions to propagate to local wireless access point
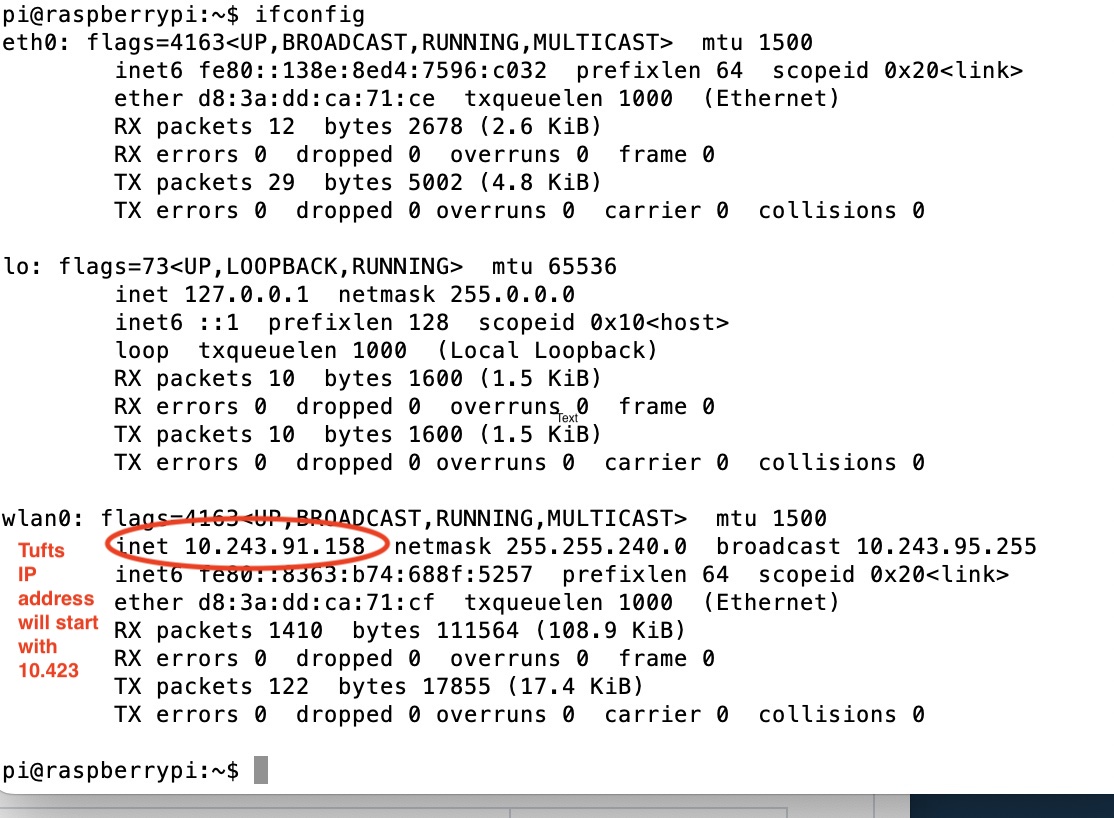
- Use the `ifconfig` or `hostname -I` command to find the IP address assigned to your Pi by Tufts_Wireless.
- Type `logout` to disconnect your Terminal from your Pi so that you can switch to logging in via SSH.
Set-up checklist 4: Connect to your Pi via SSH instead of serial #
Once you have your Pi connected to the wireless network, you can log into it through SSH instead of through a USB-serial cable.
- Have your Pi’s IP address handy (do that when still connected by serial cable; use the
ifconfigorhostname -Icommand). - Make sure your Pi is plugged into power. Do not attach the serial console cable.
- Open a new terminal window.
- Type
ssh your_Pi_username@ip_address_of_your_Pi - You should be prompted for your Pi’s password, and then you should be logged in! No serial cable necessary!
Setup for Tufts_Secure #
Not needed if your Pi is already connected to Tufts_Wireless
Use the Nano text editor (opened within the Terminal window) to edit the file at /etc/wpa_supplicant/wpa_supplicant.conf.
- To open this file in the Nano text editor, type the command
sudo nano /etc/wpa_supplicant/wpa_supplicant.confinto the Terminal window where you’ve logged into your Pi. - The
sudopart sets you as a “super user” with permission to edit the file. Add the text from the gray box below - with the password inserted - to the wpa_supplicant.conf file. - Ask an instructor or LA or friend for the Nolop_IOT password; we try to avoid publishing passwords on the internet.
- The purpose of the text below is to tell your Raspberry Pi to log into the Tufts_Secure network under the username “Nolop_IOT,” which the Tufts IT department created just for class purposes like this one. It is okay for many users to be logged in under this Tufts_Secure account.
- After you’ve edited the wpa_supplicant.conf file, when you next boot up your Pi, it should log in to Tufts_Secure and be given an IP address. Type
hostname -Ito print the IP address of your Pi.
Network settings for Tufts_Secure #
network={
    ssid="Tufts_Secure"
    key_mgmt=WPA-EAP
    pairwise=CCMP
    eap=PEAP
    identity="Nolop_IOT"
    password="YOU PUT THE PASSWORD HERE IN QUOTES"
    phase2="auth=MSCHAPV2"
}
What the Imager should look like #
The OS customization options you should pick #
Make sure you set the password for the user pi. You should probably write it down somewhere else too.
You should also enable SSH, but you could also do that later with the command sudo raspi-config.
FAQ #
How do I turn off my Pi? #
Type the command sudo shutdown
What if I forgot to choose Tufts_Wireless as my network when I imaged my SD card? #
- Follow checklist 2 above to log into your Pi with a serial console cable.
- Type the command
sudo raspi-configto list Tufts_Wireless as the network. - In
raspi-config, pickSystem Options > Wireless LAN - Enter
Tufts_Wirelessfor the SSID and leave the passphrase blank. Exit raspi-config.
Is there a way to change my login password when I’m already logged in to my Pi? #
You can change some of your Pi’s settings, including its password, with the Raspi-Config application. To run it, type the command sudo raspi-config
What operating system should I use on my Pi? #
Unless you have a good reason not to, you should start with the Lite version of Raspberry Pi OS. The Raspberry Pi imager will download it for you. Previously called Raspbian, the OS should be based on Debian Buster or newer (as older versions will not work with a Pi 4).
How do I figure out what name is assigned to the USB-serial adapter when I plug it in? #
On Windows 10, it’s usually COM3 (but it is not uncommon to have a different number). You can check for sure in the Device Manager control panel under Ports (COM & LPT)
On macOS, it’s called /dev/tty.usbserial-123456, but the numbers at the end change. You can check it by running ls /dev in Terminal.
On Linux it’s called /dev/ttyACM0, but the number will depend on how many USB devices are plugged in. As with macOS, you can check by running ls /dev in Terminal.
When I open config.txt with Notepad, the lines all run together. How do I fix this? #
Use a better text editor, like Sublime Text, Textmate, or Notepad++. You could also try Wordpad.
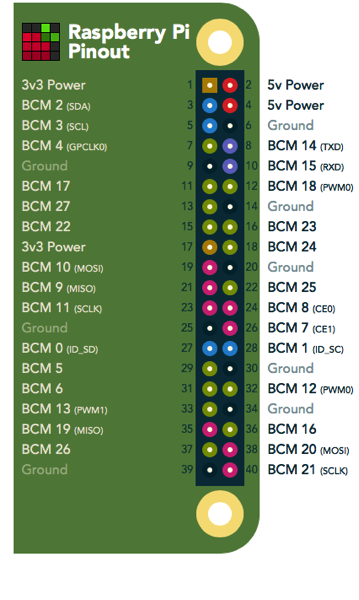
What do the pin numbers correspond to? #
All the most recent Pi’s share a standard pin format. Below is a handy guide. This site is also an excellent resource for reference.
Tutorials from the Raspberry Pi Foundation on using the GPIO pins:
https://projects.raspberrypi.org/en/projects/physical-computing/1