Raspberry Pi setup #
Stuff you need (all in your kit) #
- Raspberry Pi 4
- micro SD card
- USB-C power supply
- USB-serial adapter, AKA a console cable
You may also need a USB card reader, if you don’t have a card slot built into your computer. We have some adapters in the bin under the pickup table that you can borrow to burn your SD card if needed.
To connect the console cable, look at this diagram.
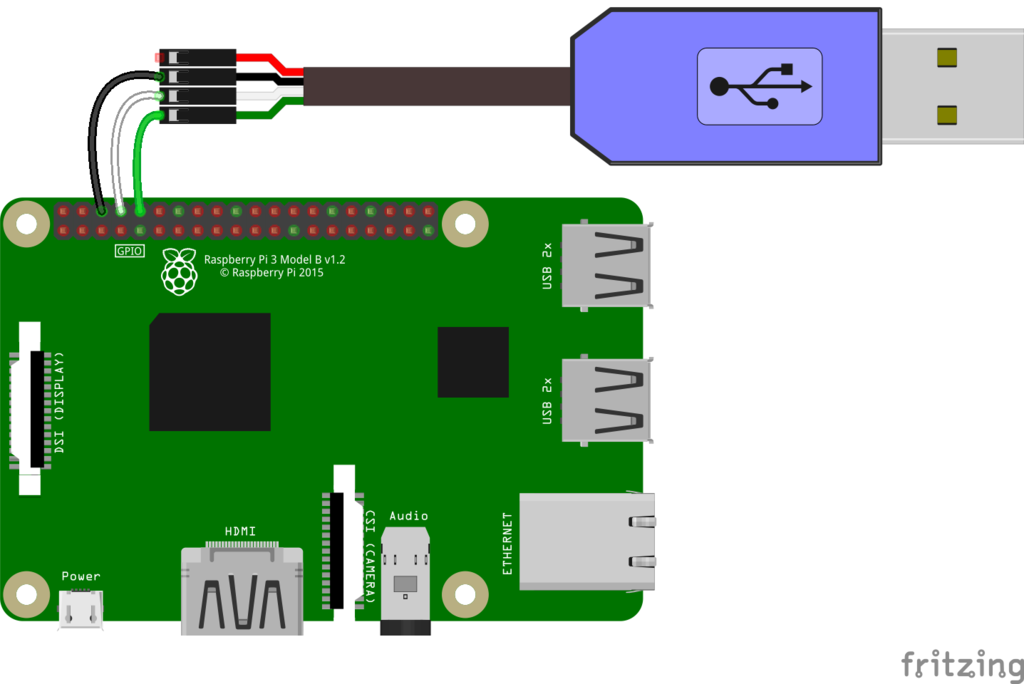
There are more details if you need them in Adafruit’s console cable tutorial. Emily K. also recommends the Sparkfun tutorial.
Setup checklist #
- Download an OS image AND the Raspberry Pi Imager from the Raspberry Pi Software page
- Burn the image to micro SD card with imager
- Edit config.txt on micro SD card to include: `enable_uart=1`
- Install the driver for the console cable (can be found on the Adafruit tutorial linked above)
- Connect RPi to laptop with console cable
- Put micro SD card in slot of Pi
- Install PuTTY (Windows) or open Terminal (macOS)
- Start a session at 115200 bps to the Pi
- Connect USB-C power cable
- Log in with username `pi` and password `raspberry`
- Run `sudo raspi-config` to set up your wireless connection and enable SSH.
Checklist for Tufts_Wireless #
- Figure out the Pi's MAC address with `ifconfig`. Be sure you get the MAC for `wlan0`, not `eth0`.
- Register that MAC address with Tufts IT
- Wait a few minutes for MAC address permissions to propagate to local wireless access point
- Add network information to `/etc/wpa_supplicant/wpa_supplicant.conf`
- Reboot Pi
Checklist for Tufts_Secure #
There’s a bug in /lib/dhcpcd/dhcpcd-hooks/10-wpa_supplicant in the current version of Raspbian OS (based on Debian 10.4, Buster). This post explains how to fix it, but we haven’t verified that it works yet: https://medium.com/@iced_burn/raspberry-pi-connected-to-wifi-of-wpa2-enterprise-ddd5a40c0b07
FAQ #
What OS image should I use? #
Unless you have a good reason not to, you should start with Raspberry Pi OS. Previously called Raspbian, the OS should be based on Debian Buster or newer (as older versions will not work with a Pi 4).
How do I figure out what name is assigned to the USB-serial adapter when I plug it in? #
On Windows 10, it’s usually COM3 (but it is not uncommon to have a different number). You can check for sure in the Device Manager control panel under Ports (COM & LPT)
On macOS, it’s called /dev/tty.usbserial-123456, but the numbers at the end change. You can check it by running ls /dev in Terminal.
On Linux it’s called /dev/ttyACM0, but the number will depend on how many USB devices are plugged in. As with macOS, you can check by running ls /dev in Terminal.
When I open config.txt with Notepad, the lines all run together. How do I fix this? #
Use a better text editor, like Sublime Text, Textmate, or Notepad++. You could also try Wordpad.
What network settings do I need for the Tufts wireless network? #
First, you need to register your Pi’s MAC address at the Tufts registration page. You can get the MAC address using the command ifconfig.
Then, use the settings below in /etc/wpa-supplicant/wpa-supplicant.conf
network={
    ssid="Tufts_Wireless"
    key_mgmt=NONE
}
What about Tufts Secure? #
Read the note above about the bug in /lib/dhcpcd/dhcpcd-hooks/10-wpa_supplicant.
The LA’s can tell you the Nolop_IOT password; we try to avoid publishing passwords on the internet.
network={
    ssid="Tufts_Secure"
    key_mgmt=WPA-EAP
    pairwise=CCMP
    eap=PEAP
    identity="Nolop_IOT"
    password="YOU PUT THE PASSWORD HERE IN QUOTES"
    phase2="auth=MSCHAPV2"
}
What if I want to install more software and write cool programs? #
First, update the APT package manager, and you’ll probably want to install Pip3, which installs modules for Python 3.
sudo apt update
sudo apt install python3-pip
Then you can install lots of fun stuff.
sudo pip3 install RPi.GPIO
How do I write, edit, and save pieces of code on my Raspberry Pi? #
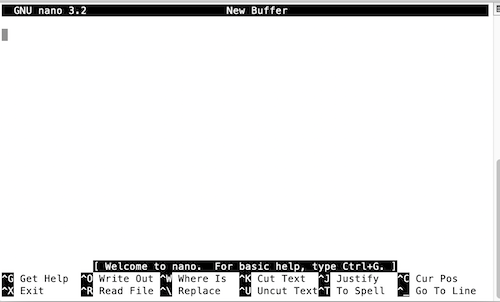
nano text editor
First, you might want to create a new directory (i.e., folder) to store all the code you write. If you are writing Python scripts, you could call your new directory python-scripts. Use the commands pwd (print working directory) and cd (change directory) to see the current directory and to switch to a different one if needed. Once you are in the /home/pi directory, create a new directory to store your scripts. Use the mkdir (make directory) command for this.
pi@raspberry:~ $ pwd
/home/pi
pi@raspberry:~ $ mkdir python-scripts
pi@raspberry:~ $ cd python-scripts
pi@raspberry:~/python-scripts $
pi@raspberry:~ $ pwd
/home/pi/python-scripts
Next, you may want a text editor that runs in your terminal window to write, edit, and save your scripts. You can use nano, which comes pre-installed in the Rasperry Pi OS. To run it, type nano in the terminal window once you are logged into your Raspberry Pi. Within nano, use Control-O to save a file (“Writing Out” = saving) and Control-R to open a file (“Reading” = opening).
What other useful commands might I need to know? #
ls: list what’s in a directorycd: change to a different directorysudo: execute a command as a superusercat: print out the contents of a file<tab>: try to autocomplete the command I am typing
What about some more obscure commands that could be useful? #
hostname -I: print the IP address of my Piwhich: show which program gets executed by a commandgrep: search a file for a string of text|: pipe the results of one command into another, likecat server.py | grep Flaskuname -a: tell me what version of the Linux kernel I am runningnetstat -plut: list what programs are listening on what portswget: download a file from the internetcurl: read the contents of a file on the internet as textping: send a packet to an IP address to see if it’s workingnmap: scan a network for IP addresses in usesudo apt install nmapfirst)ps -aux: list all the processes runningtop: show a live list of running programs (q to quit)dig: look up the IP address of a domain name (sudo apt install dnsutilsfirst)
There’s even more stuff at linuxcommandlibrary.com
What is something else that you want to mention, but can’t quite figure out where to mention it? #
Ah, that would be the crucial difference between Python and Python 3. You should use the commands python3 and pip3 exclusively. If you switch to, for example, just python, you will find that it will run, but none of the modules that you installed for Python 3 will show up.
You may think to yourself, couldn’t I just make python into a shortcut for python3? You could, but lots of software depends on Python and will fail if executed with the Python 3 interpreter. Unfortunately, the name python is probably used up for eternity.
How do I control pins on the Raspberry Pi? #
Here’s an example Python 3 script that sets a pin high.
import RPi.GPIO as GPIO
GPIO.setmode(GPIO.BOARD)   # use the BOARD pin-numbering system
GPIO.setup(16, GPIO.OUT)   # like pinMode(16, OUTPUT)
GPIO.output(16, GPIO.HIGH) # like digitalWrite(16, HIGH)
You can save this as a file and then run it with python3 name-of-the-file.py, or you can paste in each line at a Python prompt if you want to play around with it.
Here’s another script that checks the state of a pin.
import time
import RPi.GPIO as GPIO
GPIO.setmode(GPIO.BOARD)   # use the BOARD pin-numbering system
GPIO.setup(16, GPIO.IN)       # like pinMode(16, INPUT)
while(1):                     # do this forever
    if(GPIO.input(16)):       # like digitalRead(16)
        print("Pin is high.")
    else:
        print("Pin is low.")
    time.sleep(0.5)           # sleep for 0.5 s
What if I want to control pins through a web browser? #
Try using the Flask web framework.
You can use the python script below, which uses Flask to take input from a web browser and then uses that input to set a Raspberry Pi pin either HIGH or LOW. You could create this script and save it as server.py.
from flask import Flask
app = Flask(__name__)

import RPi.GPIO as GPIO
GPIO.setmode(GPIO.BOARD)

@app.route('/')
def hello_world():
    return 'Hello, World!'

@app.route('/pinon')
def pin_on():
    GPIO.setup(16, GPIO.OUT)   # pinMode(16, OUTPUT)
    GPIO.output(16, GPIO.HIGH) # digitalWrite(16, HIGH)
    return 'I turned on the pin.'

# Below we take input from a web browser and channel it to GPIO pin.
# app.route refers to your Pi's IP address, which you'll type into a web browser URL line when you want to control this code.
# For example, to set pin 16 on your Pi to HIGH, in your web browser you'll type [your Pi IP address]/digital/write/16/HIGH.
# Make sure the line below has the correct angle brackets in it.
@app.route('/digital/write/<pin_name>/<state>')
def digital_write(pin_name, state):
    pin = int(pin_name)
    if state.upper() in ['1', 'ON', 'HIGH']:
        GPIO.setup(pin, GPIO.OUT)   # pinMode(pin_name, OUTPUT)
        GPIO.output(pin, GPIO.HIGH) # digitalWrite(pin_name, HIGH)
        return 'Set pin {0} to HIGH'.format(pin_name)
    elif state.upper() in ['0', 'OFF', 'LOW']:
        GPIO.setup(pin, GPIO.OUT)   # pinMode(pin_name, OUTPUT)
        GPIO.output(pin, GPIO.LOW)  # digitalWrite(pin_name, LOW)
        return 'Set pin {0} to LOW'.format(pin_name)
    return 'Something went wrong'
You also need to install Flask for this to work.
Wait, how do I install Flask?
sudo pip3 install flask
Then, start the server (assuming your code is in a file called server.py and you replace the 0.0.0.0 with your Pi’s IP address):
export FLASK_APP=server.py
python3 -m flask run --host=0.0.0.0
By default, Flask will listen on port 5000, so check http://your.rpi.ip.address:5000 to see if it worked.
That’s cool, but how do I get Flask to start itself when the Pi boots?
For that, you want to install Supervisor.
sudo apt install supervisor
Check that Supervisor is installed properly and running.
pi@raspberrypi:~$ sudo supervisorctl
supervisor> status
supervisor> exit
Tell supervisor that you want it to run Flask for you by adding something like the lines below to /etc/supervisor/supervisord.conf
[program:flask]
directory=/home/pi
environment=FLASK_APP="server.py"
command=python3 -m flask run --host=0.0.0.0
Then, make Supervisor read the config file.
sudo supervisorctl
supervisor> update flask
flask: stopped
flask: updated process group
supervisor> status
flask                            RUNNING   pid 14183, uptime 0:00:09
If Supervisor can’t start Flask for whatever reason, it will write error messages in the log files, which you can find in /var/log/supervisor/. In general, it’s probably a better idea to debug your Flask code pretty thoroughly before you start using Supervisor, but if bugs come up, the log files are your best hope. You can also just stop Flask under Supervisor and going back to running Flask from the console yourself.
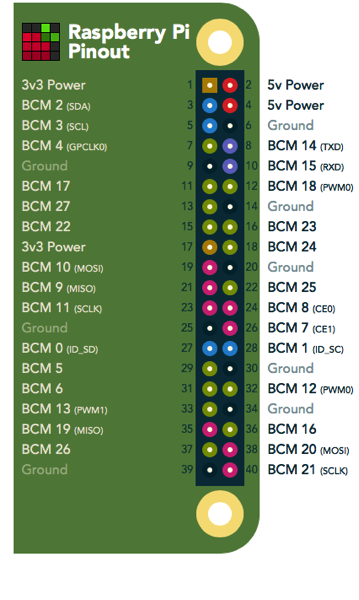
What do the pin numbers correspond to? #
All the most recent Pi’s share a standard pin format. Below is a handy guide. This site is also an excellent resource for reference.